Tuesday, August 16, 2016

Modeling the EBT Track Scale

The current phase of layout construction involves recreating the East Broad Top shops, turntable and roundhouse.  Some of these structures were available in kit form, most of them from White Ground. Unfortunately, the White Ground company has been out of business for many years, although it is occasionally possible to pick up a kit on eBay.  Other than these few kits, the rest of the shop buildings had to be scratch built.  At this point, most of the shops have been modeled are are now on the layout.

One of the structures still missing from my railroad is the track scale and scale house at Orbisonia. The EBT had several scales, allowing them to track any losses in shipping coal from the mines at Robertsdale to the coal cleaning plant at Mount Union.  The scale at Robertsdale was housed in the Robertsdale station, where it still resides.  A detailed account of modeling the station can be found in a previous post.


The EBT also had track scales at the mines, Orbisonia and at Mount Union, where the coal was dumped, washed, sorted, and transferred to Pennsylvania Railroad hoppers for shipment.  I knew that a track scale was located at Orbisonia on one of the tracks leading to the car shop.  That track also had a underground coal dump and elevator to transfer coal from a loaded hopper car to the coal bin, where it was used to fire the boilers that powered the entire shop complex.  The scale was used to weigh the coal used, and also to weigh cars built or repaired in the car shop.

When I started this project, I had no idea what the scale house looked like.  I had never seen a photo of it, although its approximate location is indicated on the FEBT map of the shops.  Since I was not aware of an extant picture, I felt free to construct a "typical" scale house.  I also found a Builders in Scale kit for a small board and batten scale house that looked like it might fit in the available space, and decided to construct and install it on the layout.


The kit also included material for constructing the scale itself, but I opted to use a plank grade crossing kit from C. C. Laser.  The crossing was installed over code 70 ME flex track.   Because of the tight space available on my layout, the scale had to be constructed on a slight curve, so I used a curved grade crossing kit. The radius of curvature did not exactly match the laser cut timbers, so I cut the curved crossing at the end of each set of planks, and adjusted the curve to match the track.  Eighth inch square strip wood was used to make the concrete foundation for the scale, which was bent to match the curve of the flex track and then painted with Floquil aged concrete.  I liked the little house, but something felt wrong.  It just didn't seem to fit the shabby buildings around it, and it seemed a  little too "nice" for a structure that was probably used very infrequently.

Then I struck gold!  Leafing through my copy of Deane Mellander's Slim Gauge Survivor I found a photo of the actual scale house as it appeared toward the end of the railroad's life as a common carrier.  It also depicted the track work for the scale, which was accessed by stub switches at either end.  You can see from the following photo that the real scale house bears very little resemblance to the one from Builders in Scale.  For one thing, the prototype was heavily worn and weathered, not like my cute little house.  It had a simple slant roof from front to back, and an odd set of four windows facing the scale, with a single window on the side..


With a picture of the prototype in hand, I immediately made the decision to move my newly built scale house to the coal plant in Blacklog, which is my free lanced version of Mount Union.  I had a coal cleaning plant, but no scale to weigh incoming loads of coal.  The new house seemed to fit perfectly on track leading to the coal dump.  Here it is simply set in place without any scale track. Still looks pretty good!


So now I had a photo to work from in building an accurate scale model of the prototype scale house. But the picture shows only the south and east sides of the structure, and the general outline of the building.  I suspected that the north side had a door, and the back was probably just a blank wall.  But without dimensions, I would have to guesstimate the exact size of this unique little building.

Then another EBT modeler reminded me that the winter 2015 issue of the Timber Transfer, published by the Friends of the East Broad Top, contained an article by Ron Pearson that included a sketch of the EBT scale house at Wood, a few miles south of Robertsdale, complete with dimensions. The Wood scale house looked a lot like the one at Orbisonia.  It made sense that the railroad might use a common design for both structures, so I decided to scratch build the scale house based on the dimensions of the one at Wood.  That meant that the front of the building facing the tracks would be 8' wide by 8' tall.  The rear wall, blank as I suspected, was 8' wide by 7' high.  The house had a slant roof made of corrugated iron painted black, as was typical for the EBT shops.

I still had to figure out the windows.  Rummaging through my box of spare windows and doors, I found a pair of sprues with 4 over 4 windows about 6 feet high.  I occured to me that if I removed the vertical window muntins and turned the window on its side, I would have a four pane window that looked exactly like the prototype.  (I also had to sand down the window sill so that both ends match.) A simple one pane window would make do for the side, and I tried cutting down an 8 foot door to 6 foot for the north side entrance.  I cut the sides from 1/8" board and batten basswood and weathered the wood with a mixture of alcohol and India ink.  Once the sides were dry, I lightly brushed them with Minwax classic gray penetrating stain, not covering the sides entirely, to allow some of the ink darkened wood to show through.  Finally, I used an artist's sponge brush to randomly apply Floquil oxide red over the stains, making the tops of the walls a little darker where they would be protected by the roof, and the lower parts lighter or unpainted where weathering would have washed away the paint and darkened the wood.  Here is a photo of the walls on my workbench before assembly.


I used 1/16" stripwood for bracing on the back sides of the pieces, and assembled it with white glue. The scale was beginning to resemble the one in the photo.  But I still wasn't happy with the door on the north side.  It was just too wide.  And most of my other doors were Colorado types, which didn't seem to match the dilapidated appearance of the Orbisonia scale house.  Finally, I decided to scrap the nicely painted door, and use scribed basswood planking to make a beat-up wooden door, which I felt was more prototypical.  Here is the door side of the finished structure.


And in the following photo are the south and east sides as depicted in the prototype photo.


I cut a styrene base for the concrete foundation, using an access door to the scale mechanism from the Builders in Scale kit.  The foundation was painted aged concrete and the trap door grimy black.  The roof and sides were then brushed with grimy black, dirty brown and rusty brown weathering powders. Even though the track is not yet ballasted, the little scale house seems to fit perfectly with the EBT shop scene.


 I will finish by extending the scale rails either side of the scale, and adding harp switch stands to suggest stub switches.  The ground will be covered with actual cinders and boney taken from the EBT yards.

Sunday, February 14, 2016

Pursuing the AP Certificate in Prototype Modeling

For the last several years I have been working on the National Model Railroad Association's Achievement Program, with certificates for Author, Electrical Engineering, Structures, and Scenery. The category of Master Builder - Prototype Models is the newest in the Achievement Program, if you can call 1987 new.  This certificate goes beyond Master Builder - Scenery which calls for creating scenery in a prototypical manner, and judges how well one creates a specific prototype scene in miniature.

To qualify, one has to build a model of a prototype scene containing at least six models of prototype equipment and structures.  At least four different tuypes of models have to be represented:
  • Rolling stock
  • Railroad structures
  • Caboose or passenger car
  • Motive power
Any two of these six models have to be scratch built; the rest must be super detailed.  Finally, plans or photographs have to be provided to verify that the model faithfully represents the prototypical scene.

I chose to model the mining town of Robertsdale, Pennsylvania, the southern terminus of the East Broad Top narrow gauge railroad, which operated as a common carrier from 1875 to 1956, and another 50 years or so as a tourist railroad.  Specifically, I wanted to model the four railroad owned and built structures in Robertsdale's company square: The company store, the railroad station, the post office building and the Rockhill Iron and Coal Company office building.  All four of these structures were clustered around the railroad crossing of Main Street.  Three of them still stand; the company store was raised in the 1990s.  In the following photo, the old post office building is on the left, with the station partially visible behind it.  The coal company office building is on the right.  


In addition to the requirements cited above, one has to submit photographs comparing the model to the prototype,  Side by side pictures are encouraged, to show how the model reflects the original. Finally, a detailed written description describing the setting of the model railroad is required, as well as methods and materials used to build the prototype scene.  While all this was a lot of work, it was also fun to set up photos comparing scenes from long ago with the model railroad in my home.  Here is an overview of the company square on my layout.


The old post office is in the lower left corner.  The company offices are the stone buiilding with brick trim in the lower right.  Across the tracks can be seen the company store on the right and the depot in the center, partially blocked by EBT #14 pulling box car #170.  Behind them is EBT combine #14 parked in the front of the station. In order to fit the scene into the available space, Main Street had to curve more sharply to the left than in the prototype.  Otherwise, all buildings are in the correct relationship to each other.

The company store was the first structure erected in Robertsdale when the railroad arrived in 1875.  It was never actually run by the railroad, since Pennsylvania law did not allow mining companies to operate their own stores.  But the building was leased by merchants who provided everything from explosives and mining tools for miners to meat, poultry, clothing, and candy for the families of the miners and railroad men who lived and worked there.  This is a photo of the building in the 1950s.


And here is the same building as scratch built for my layout.  the building was made of styrene covered with stone block self-adhesive paper from Micro Mark.


Coal was mined from a number of shafts and drifts located south of Robertsdale.  Hopper cars were filled with the semi-bituminous "smokeless" coal from tipples and truck dumps.  Then the hoppers were allowed to roll back down to the Robertsdale station, where a track scale weighed the loaded cars.  The scale was a "rolling" type, where the cars were handbraked as they passed over the scale, then rolled further down the track to a siding where the next train north was made up.  Here is a photo of one hopper car rolling over the scale with a brakeman aboard:


And here is the same scene as it appears on my EBT model railroad:


The good people of Robertsdale did what they could to "pretty up" their little mining town  At the center of town a small park was installed, and the flowers carefully tended by the side of the tracks. Here is the scene as it looked in the 1950s:


And here is how it appears on my layout:


In its last days before abandonment, passenger service was discontinued except for the mail train. Often the train consisted only of the M-1 gas electric car, "kit built" by the railroad from parts purchased from Brill:


Here the past lives again on my EBT model railroad:


The model includes scenes of life in a small mining town as recorded in photographs of the time.  Here a group of teenagers is found hanging around the station one summer day.  There wasn't a lot to do in mid-century Robertsdale.


And here is my recreation of that long ago scene.  Not being able to find figures that precisely matched those in the picture, I tapped Woodland Scenics for typical teenagers -- including one who looked more than a little like "the Fonz".


Another old photo showed some local children playing alongside the tracks -- maybe a little too close by modern standards:


Here is a model of the prototype that captures the essence of those small town days.


In the following photo, a south bound train of empty hoppers thunders across Main Street and past the Robertsdale station:


Here is the same scene on my model railroad:


Not everything in Robertsdale revolved around the railroad and the coal mines.  Kids still enjoyed a game of sandlot baseball, with a retired neighbor to cheer them on.  The following scenes have no photographic prototype, but accurately reflect what life was like in those days,


The prototype model received 109 out of 125 possible judging points, and has been submitted to the NMRA for review.  If all goes well, my tally of AP certificates should increase to 5, with two more needed to qualify for Master Model Railroader.  I am already at work on the last two.

Saturday, February 6, 2016

Scratch Building the EBT Mount Union Tank

Among the iconic structures of the East Broad Top Railroad -- the Timber Transfer gantry crane, the Orbisonia station and roundhouse, and the Robertsdale company store -- one would surely have to include the unique water tanks located along the 30 mile mainline from Mount Union to the coal fields of Broad Top Mountain.

The East Broad Top tanks were enclosed in roughly trapezoidal structures to protect them from freezing in cold weather.  While there was a family resemblance among the tanks, from Mount Union to Saltillo to Robertsdale and Wood, each tank has its own individual character.  Originally most or all of them were constructed of rough planks or board and batten siding, with a stove inside to heat the tank and provide respite for crews.  This is a photo of the Mount Union tank in its original form.


The shed on the right is unique to the Mount Union tank.  The tank at Saltillo had a simple lean-to and space inside for a hand car.  Others, like the tank across from Mine #1 at Robertsdale, were utilitarian box-like structures.  Some had wood siding, some Insulbrick, and some were half and half. The Mount Union tank had windows on the front and back, and was used by the yard crews between jobs.  When the above photo was taken in the 1940s, the siding was already in poor shape,  The following photo shows the tank as it appeared around 1950, with the wood siding covered by Insulbrick asphalt shingles.


In the background can be seen the Mount Union engine house with Jack's Mountain in the distance. Below is a view from the back taken after the end of common carrier operations in 1956.  The tank is clearly the worse for wear with the rafters showing under the shake roof.


In the following view from the last years of common carrier service, one of the EBT narrow gauge locomotives is getting a drink from the Mount Union tank, while standard gauge 0-6-0 #3 is steaming into the engine house after a busy day shifting narrow and standard gauge hopper cars loaded with Broad Top coal.


I have always been intrigued by the EBT tanks, which are not often modeled, perhaps because they were so mundane in appearance.  White Ground Models produced a kit for the Saltillo tank many years ago, which can occasionally be found on eBay.  I picked up a couple of them over the years with the intention of modeling the EBT tanks. I also ran across a Model Hobbies kit for a Huntingdon and Broad Top water tank for $1.95 (from VERY long ago!) that looked a lot like the EBT tanks. The Saltillo tank kit contained four basswood walls, cast hydrocal foundations for the tank and shed, windows, door, chimney and parts for the spout and mechanism, but it didn't really resemble the Mount Union structure as it appeared in 1950, the time I model.  For one thing, the sides were board and batten, which did not match either the earlier plank construction or the later Insulbrick siding.


Then I realized that since the board construction can't be seen under the Insulbrick siding, it wasn't necessary to use the basswood walls in the kit, except as templates to cut four walls out of 1/16 inch styrene, which would then be covered with printed paper Insulbrick shingles.  I proceeded to cut out the sides, then score and cut out the openings for the windows and the door.


In the photo, the four walls are shown resting on a sheet of Clever Models brown Insulbrick self-adhesive paper.  The brown seemed too dark to me, but it was the closest I could come to the prototype with what was available from Clever.  Then I had a lucky break.  In searching through my files on the EBT I ran across a set of drawings on the Mount Union tank done by William E. Grant and dated February 9, 1992.  In the same file folder were several sheets of printed Insulbrick siding by William Adams in the same yellowish color seen in the above photos.  The caption on the sheets said the siding was also used on the Coles tank and the Wrays Hill tunnel north portal shanty.  I had completely forgotten I had these on hand!   When I compared the prototype photos with the two paper sidings, it was clear that the lighter color was a more accurate reflection of the original.


I assembled the walls using the Insulbrick walls in the bottom photo.  Doors, windows and corner posts were painted roof brown.  The spout, cables and pull rods were assembled as per the instructions in the kit. A sheet of corrugated metal was installed beneath the spout and painted a rusty brown.  Here is how my water tank looked before the roof was finished or the shed was attached.


The roof is made of triangular sections of cardboard that fit together to make the hip roof.  I opted to use uneven brown shake shingles from B.E.S.T. Models.  They are self-adhesive and easy to install. The most difficult part was the joints between the triangular sections of the roof.  I ended up using pair ofs shakes overlapping from the eaves to the peak to cover the seam between sections,


The lean-to structure on the right side of the tank was actually more difficult than constructing the tank itself, as it had a wood plank front but Insulbrick shingles on the side and back.  It took some finagling to get it all to fit correctly against the side of the tank, which slopes inward.  Bill Adams' drawings indicated that the shed roof was corrugated metal, which I painted black and weathered.


The tank is situated a few yard from the Mount Union engine house, where it is convenient for both standard gauge switchers and road engines to top off their tanks before the next trip.  Here the fireman for EBT 2-8-2 #14 is about to pull down the spout for a fill before heading back south to Rockhill and the roundhouse.


Wednesday, December 2, 2015

Installing an Econami Decoder in the Mantua 0-6-0

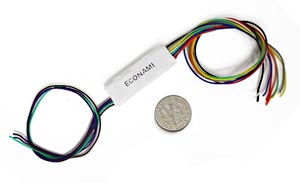
In my last post I explained how I replaced the Pittman open frame motor in my Mantua 0-6-0 switcher, in my conversion of the engine to EBT standard gauge no. 3.  With the motor in place, the next step was to install a digital decoder in the tender.  I opted for a new Econami ECO-100 sound decoder from Soundtraxx, partly because of its small size, and partly because of its new features, which include a large selection of bells, whistles and other sound effects.
The Mantua slope back tender has plenty of room for a decoder and speaker, but I also wanted to install one of the Soundtraxx Current Keepers, a capacitor array designed to keep the motor and sound operating for short periods when power is interrupted, as for instance over switch frogs and dirty spots on the track.


The Current Keeper is somewhat larger than the Econami 100, but there was still plenty of space in the tender for the various components.  I decided to mount the sugar cube size speaker under the coal pile, with holes drilled in the coal to allow the sound to escape.  Here you can just make out the holes on the coal pile.


The sugar cube speakers are very powerful 8 ohm devices originally designed for smart phones, but they are perfect for those tight places on smaller scale locomotives.


The key to obtaining maximum sound from any speaker is the enclosure.  Sound is created by the vibration of a thin metallic membrane, which moves the air around it.  The membrane moves the air on both sides, creating sound waves on the front and the back of the speaker.  But the sound waves from the front and the back are 180 degrees out of phase.  To prevent the sound from one side of the speaker from cancelling out the waves from the other side, the speaker must be fitted to some sort of container that prevents sound waves from escaping both sides at once.  Here I have shown a speaker with a wooden enclosure that fits tightly around the back of the speaker.  Enclosures can be made from virtually any material, from wood to styrene or even paper!  The following picture shows the speaker mounted in the enclosure, ready for installation.  I have not yet connected wires to the speaker terminals in this view.


In the next photo, the speaker has been mounted in the tender, facing up, and secured with a piece of green masking tape.  The Econami decoder lies on top of the back of the speaker, its wires separated with clothes pins to make wiring easier.


Here is a closer look at the arrangement of wires.  Since I did not intend to add special effects lighting other than the headlight, extra function wires were coiled and wrapped with a strip of blue masking tape.  The Current Keeper has not yet been installed.


In the following photo, the decoder has been hard wired into place,  The Current Keeper is the long purple device next to the white Econami.  The wires going to the locomotive include the white lead to the LED headlight.  The other headlight wire was connected to the engine shell, eliminating the need for a blue common line to the decoder.  The other wires between engine and tender are the orange and gray motor leads and a red wire, which is connected to the frame of the engine for track power from the engineer's side.


The long black wire hanging free from the tender is for track power from the fireman's side of the tender trucks.  The Mantua tender was designed to channel track power from the wheels, through the trucks, to the floor of the tender.  To ensure a solid contact between the rail and the decoder, I decided to install wipers to the left side tender wheels, and not rely on the axles to carry the power.I made the wipers by soldering a short length of .01" phosphor bronze wire to a small square of printed circuit board, as shown below.


A length of #36 wire was also soldered to the PC board, and channeled through a hole in the bottom of the tender floor.  Wires from each of the two trucks were connected to the black wire from the decoder by screwing them together to the floor of the tender.  I bored a hole, then tapped for a 2-56 screw to provide  power  from the tender.


Here is a view of the finished product.  The 1.2K resistor is in the headlight circuit.  The light is still too bright for my taste, so I plan either to replace the resistor with a higher value or reduce the current to the LED by adjusting the lighting CV on the Econami.  If you have a sharp eye, you may also notice a piece of blue tape near the front of the tender.  Just to be safe, I installed a solid state fuse to protect the decoder from a power surge to the motor.  Once I decided to replace the open frame motor with a Sagami can motor, the danger of such a surge was eliminated, but I left the fuse in anyway.


After successfully testing the decoder on my workbench, I closed up the tender and tried running the engine on the layout.  Once I was comfortable with the operation, the next step was to program the decoder CVs for the specific sounds I wanted on EBT #3.  A future post will include programming and weathering the engine and installing the standard and narrow gauge couplers on the tender,