Friday, August 23, 2019

Modeling the NARCO Spur and Tipple - Part II

Modeling the NARCO tipple did not seem like a difficult project.  After all, it was just a big box on stilts.  But once I started working on plans for the structure I ran into a problem.  There are no plans or drawings for the tipple, nor was I able to track down the dimensions of the "box".  There are a fair number of photos of the tipple, but always on an angle, never head on.  Perspective made it difficult to figure out the size of the structure by simply comparing it with nearby objects like hopper cars or a locomotive.  A friend sent me some remarkable color photos he found on the internet showing the tipple's demolition -- one even showed the tipple on its side with a clear view of its construction.  This last picture even had a man standing next to the fallen tipple.  But in spite of all this photographic evidence, the precise dimensions were elusive.


In the end I used a variety of sources to nail down the dimensions.   A fellow EBT enthusiast -- Ron Pearson -- has also modeled the tipple.  He estimated the dimensions at 15 feet on a side.  He also had worked out the height of the bunker to be 15 feet, with another 15 feet for the corrugated metal structure at the top (which I assumed contained machinery for the conveyor mechanism)..  I eyeballed the photos and it seemed to me the corrugated section on top was shorter than the rock bunker beneath it.  I ended up with an overall height for the tipple about the same as Ron's model -- roughly 30 feet -- but I made the structure on top only 12 feet high and the bunker itself 20 feet high.  Here is a photo of Ron Pearson's model.


Using my estimated dimensions, I calculated the amount of ganister the tipple could hold to be 4500 cubic feet (15x15x20).  Since hopper car capacity is measured in thousands of pounds rather than cubic feet, I had to calculate the weight of the ganister when the tipple was full to determine if my dimensions would allow enough ganister for a typical four car train.  Starting with the density of quartzite (in grams per cubic centimeter) I calculated that the tipple could hold approximately 500,000 pounds..  Knowing that the EBT ran four hopper cars up the mountain for a load of ganister, each car with a capacity of 70,000 pounds, I reasoned there was enough ganister to fill two trains of four cars each on a daily basis.

With the preliminary work done, I cut out the sides of the bunker from .040 Evergreen sheet.  Since photos of the tipple suggested that the corrugated panels on the top overlapped the steel bin itself, I started by assembling the complete structure with the assumption that the corrugated part would be cut from styrene sheet and cemented to the outside of the tipple. That would give the model more structural strength that trying to create separate upper and lower sections and glue them together.

The color demolition photos (see part l) were very helpful in determining the details of the tipple's construction.  They clearly show steel angle riveted to the corners for strength.  Two other verticle angles were riveted on each side as well.  When I added these details, the tipple immediately began to  resemble the prototype.


A cursory examination of the prototype reveals structural elements (probably angle iron) on the sides and top of the top structure, which I assumed were to support the end of the conveyor assembly.  A photo of the rear of the tipple from above (see part l) clearly shows the beams that ran down the sides and across the top of the roof.  I used Evergreen angles to construct these details.  For the legs of the tipple I used 1/4 inch styrene angle, which was cut to fit the slope of the hill on which the tipple would stand.  The legs run up the inside corners of the tipple and are cemented in place with Plastic Weld.


The top section was clad with Evergreen styrene corrugated sheet,cut to fit around the vertical angle supports.  The roof was cut from two pieces of the same corrugated sheet, with cutouts for the vertical supports.  A chute was made from styrene channel cut to approximately 20 scale feet. 


The photo showing the tipple on its side after demolition clearly shows lines of rivets running up and down the angle strengtheners as well as across the sides, presumably connecting the sides with internal structural supports.  I used Archer decal rivets to recreate the effect.  Following the Archer instructions, I used Micro Sol Red decal setting solution to fix the rivets in place.


This was a tedious process, and I found the lines of Archer decals very delicate and prone to breaking into several pieces which then had to be moved around with a fine brush and a wooden toothpick.  But the end result was worth the effort.


Sadly, as impressive as the rivet detail appears in the photo, when the model was painted, much of the effect was lost.  The rivets are barely visible on the finished model.  But I know they are there!


The photo of the demolished tipple shows in some detail the underside of the structure with the details of the support beams, made of heavy channel stock.  Careful examination of the photos failed to clarify exactly how the chute was located between the support beams, so I simply slipped it between two of the supports and cemented it in place with Plastic Weld.  When the structure was finished the underside of the tipple is not particularly visible anyway.


The tipple is connected to a conveyor that brings crushed ganister rock from the quarry above and behind the tipple.  I used a Walthers kit for a set of modern conveyors.  The kit contained parts for three sections; I needed only two to reach the quarry, partly hidden by trees at the top of the hill.  To support the conveyor a hole was cut in the back of the tipple.


The tipple was painted with a gray automotive primer.  The bottom of the tipple and the support legs were painted with red primer, giving the whole structure an industrial effect.


The quarry above the tipple was covered with clay kitty litter to give the impression of broken rock.  The crusher was made from a warehouse taken from a different kit and painted gray with the same dull red primer for the roof.  The hillside was covered with off white ballast to resemble ganister than had fallen off the conveyor.  The same light colored ballast was scattered along the tracks where hopper cars would be loaded.  Compare the photo below with a photo of the tipple as it appears on the layout.


Wednesday, July 31, 2019

Modeling the NARCO Spur and Tipple - Part 1

Historical Background

The East Broad Top Railroad was built to transport semi-bituminous coal from Broad Top Mountain in southern Huntingdon County to a junction with the Pennsylvania Railroad in Mount Union.  What people may not know is that coal was not the only major source of revenue for the EBT.  Coal from the Broad Top was used by three enormous refractories, or brickyards, that for much of the first half of the twentieth century were the largest producers of silica brick in the world.  These brickyards depended on a reliable supply of two essential resources: coal and a highly pure form of quartzite, known locally as "ganister rock".  Ganister was used to make specialized bricks for use in high temperature blast furnaces and coke ovens.

The brickyards were located in Mount Union for a reason.  Quartzite for refractory bricks has to be at least 98% silica.  Rock of this purity is only found in a few places in the U.S.  There are small deposits in Alabama and Wisconsin.  Huge deposits are found in Huntingdon and Blair Counties, especially in the territory served by the EBT.  Pennsylvania accounted for three-quarters of all silica brick produced in the U.S., and a large part of that was produced in Mount Union using fuel and raw materials carried on the EBT.

Ganister rock forms a layer 400-500 feet thick on Jacks, Blacklog, Shade, and Tuscarora Mountains along the main line and branches of the EBT.  Because ganister is so hard, over millions of years the rocks around it weathered away revealing exposed areas of quartzite that eventually collapsed, leaving large stretches of broken rock known as flow rock.  These flow beds were as much as 35 feet thick and covered the mountain side.  Some of these deposits extended for miles.  The railroad was an essential part of the supply chain that quarried these ganister deposits and transported them to the Mount Union refractories.

The NARCO Spur and Tipple

Some of the largest deposits of ganister were found on Jack's Mountain.   Harbison-Walker -- the largest of the three refractories -- developed quarries on both sides of the Juniata River served by a network of inclines, tracks and conveyors.  The other two brickyards -- General Refractories (GREFCO) and North American Refractories (NARCO) -- used the railroad to transport ganister from other areas around Mount Union.  In 1911 the predecessor of NARCO developed a quarry on the side of Jack's Mountain about four miles north of Three Springs at Old Woman's Gap.

The original tipple -- shown here -- was a timber structure located directly over the track. Note that the hopper cars are small wooden hoppers rated between 9 and 12 tons.


In 1942 the wooden tipple was replaced by a steel structure.  The EBT laid a spur up the mountain to the new tipple.  The NARCO spur was a steep 2 1/2 mile grade.  Crews shoved empty hoppers up the branch with the locomotive on the downhill end to protect against runaway cars.  At the tipple there was a double ended siding.  Cars were spotted above the uphill switch and moved under the tipple by gravity as needed.  Here is a photo of the tipple in operation.  Note the boards next to the car being loaded to prevent rock from bouncing out of the car.


Here is a photo of the tipple from the rear showing  the conveyor that extended back to the quarry and rock crusher.  The structures on the top of the tipple may be supports for the conveyor machinery.


This spur continued to generate traffic right up to the last EBT freight in April 1956.  As soon as the railroad shut down, NARCO removed the tracks and converted the tipple to serve trucks.  The quarry continued to provide ganister into the 1960s.  Recently I came across a series of color photos documenting the tipple's demolition.  A front loader was connected to the tipple and pulled it over. 


As the tipple begins to collapse a cloud of ganister dust emerges from the structure.


The rusty hulk of the tipple lies on its side waiting for the cutting torch.  A witness to its demise stands next to it.  Note the concrete footer in front of the man.  This photo provided a wealth of information about the details of the tipple's construction. It was extremely useful in determining the dimensions of the prototype in order to construct the model, which I will detail in my next post.


Tuesday, July 9, 2019

Building the EBT Coal Dock

Background

The East Broad Top built a massive coaling dock at the south end of the Rockhill yard around the turn of the century.  For fifty years coal was deposited in the bunker by hopper cars pushed up an incline as shown in the following photograph (photo by Philip K. Hastings).  No. 15 has spotted a hopper in the receiving bin and now drifts back down to the main.


In the following photo No. 16 passes the concrete bunker with its chutes for loading coal into narrow gauge tenders.  (Photo by John Krouse)  About the time the railroad ceased operations in 1956, the shed was removed to allow coal deliveries to be made by truck.  The tracks leading up to the receiving bin  were taken up at that time.  When I attended my first Winter Spectacular in the mid-1970s, the coal dock was still in use.  Toward the end of the tourist era, the railroad abandoned the concrete coaling facility and used a front loader to fuel the tenders.


In building my model of the Rockhill shops, I had always planned to include a model of the coal dock.  Long ago I purchased the White Ground kit for the structure, and for years it sat on a shelf waiting for the "right time" to build it.  The mountain that ran behind my shop complex ended with a gaping hole where I planned to place the coal dock.  Because of the layout of the shops, my dock had to be on the opposite side of the tracks from the prototype.

I was motivated by a visit to the EBT in 2015.  While attending the annual Fall Reunion of the Friends of the EBT, I wandered around the south end of the yard and took some photos of the coaling dock as it looks today.  The shed is gone and the chutes have seen better days, but it still looks much as I remembered it some 45 years ago.


Building the Kit

The bunker is constructed from four sheets of basswood, which had to be cut to size from the plans that come with the kit.  This is typical of White Ground kits.  They are essentially a box of sticks with some detail parts made of soft white metal. The box also included a plaster front wall for the structure and two additional retaining walls.


After painting the bunker black, I test fit the front wall against it.  The walls were painted a light gray to suggest aged concrete.


I put the coal bunker aside and began to construct the shed that sits on top of the bunker, referred to in the instructions as the receiving bin.  The basic structure is made of strip wood assembled with Aileen's tacky glue.  I used right angles to make sure everything was straight and tight.


Masking tape was used to fix the sleepers on a glass plate.  Even after the glue was dry the frame was a little wobbly -- until the roof was glued in place.  The roof is made of stiff cardboard and helps to hold everything square/


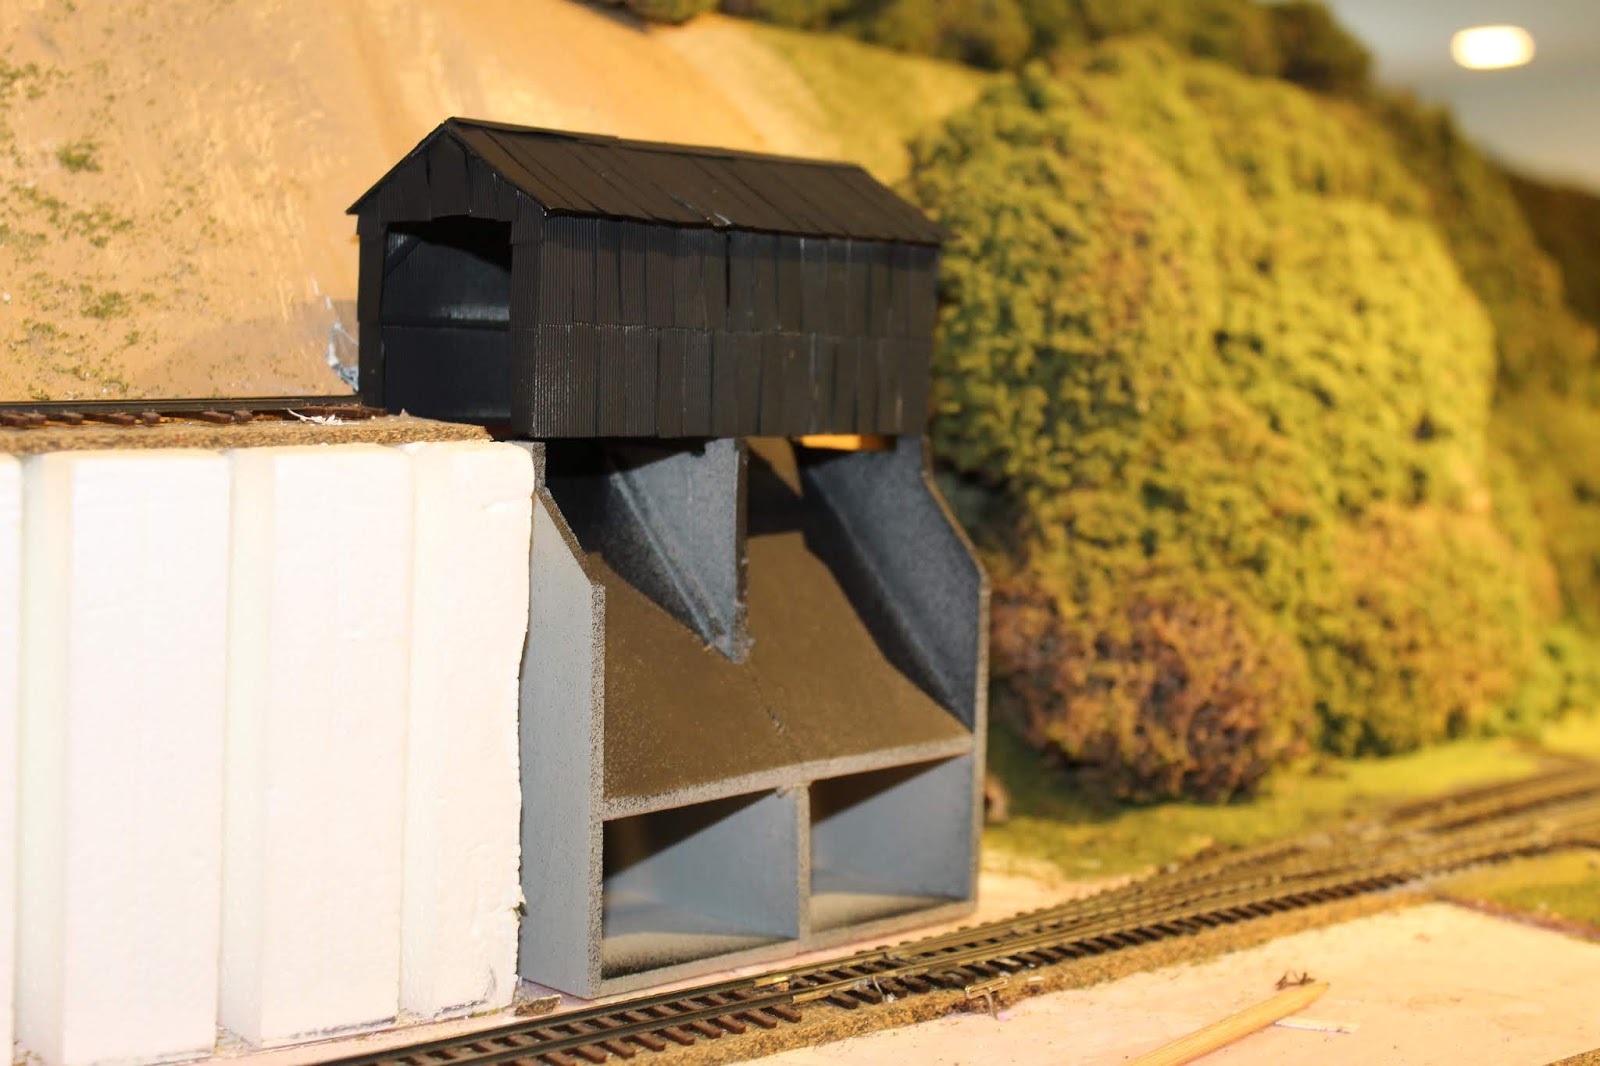
With the receiving bin frame finished, I test fit the entire assembly in the place reserved for it.  The styrofoam incline on the left is from Woodland Scenics and supports the incline tracks.  Another styrofoam riser will fill the void on the right when the model is finished.


The receiving bin is covered with corrugated metal panels, made from Campbell's corrugated siding.  I tried to make the siding look somewhat beat up even before painting.   For the back of the shed, which is not visible from the aisle, I used a single sheet of corrugated siding.


I sprayed the building with Tamiya XF-69 NATO Black, which is as close as I could come to Floquil's grimy black.  Here is the shed test mounted on the coal bunker.


The same technique was used to build the roof on the bunker.


Here is a photo of the entire assembly with the styrofoam fill on the right side of the coal bin.  The dotted line on the styrofoam indicates where the foam will be cut to match the angle of the bunker roof.


At this point I laid the bunker and receiving bin aside and focused on detailing the front wall.  There are several openings cast into the hydrocal wall.  Just above each of the chutes is an opening with coal boards to control the output.  Two access doors are at ground level.


Before adding the details, including the chutes, cables, pulleys, gutters and downspouts, I used Pan Pastels to age and weather the front of the coal dock and the two retaining walls.  The walls were treated with rust, charcoal, and other colors to imitate the pictures of the structure as it is today.  Compare the two following photos.


The front wall details are made of white metal castings.  Many of these castings needed to have flash removed and holes drilled in incredibly tiny parts.  I painted the parts with Tamiya NATO black and Pan Pastel rust.  The corrugated panels were given a similar treatment.  By now the bunker was starting to look more realistic.


At this point the coal dock was essentially complete.  The rest of the project involved creating the scenic setting and laying the track.  I cut the styrofoam risers to match the angle of the bunker roof, then painted them a flat black.  On the prototype the track sat on boney ballast, like most of the yard tracks.  Lichen foliage was glued to the mountain side, track was laid and an EBT hopper car finished off the scene.


The last step was to brush a thick layer of matte medium on the black slopes and shake a layer of sifted boney over them.  I brought actual Rockhill boney back from my last visit to the EBT in 2017.


 Since finishing up the coal dock, I have wired the incline track and run No. 18 backward up the incline pushing a loaded hopper into the receiving bin.  The last time that happened on the prototype was nearly 50 years ago!

Friday, January 18, 2019

Finishing Pogue Bridge

In my previous post I described how I constructed the East Broad Top's longest bridge across the Aughwick Creek in southern Huntingdon County, Pennsylvania.   The bridge passes over a lush, tree covered valley and the old road to Three Springs, as well as the creek.  With the bridge in place, the next step was to create the valley floor and creek bed.


From the photos I took of the bridge, I could see that the creek filled most of the space between the middle support pier and the south pier next to the road.


I used a knife and a Surfoam tool to rough out a channel for the creek.  I then lay plaster bandage strips across the bed of the creek to smooth out the bottom, and to prevent leaks when adding the Woodland Scenics Magic Water as described below.


I created the embankments leading up to the bridge also using plaster cloth.  I secured one inch strips of stiff paper between the styrofoam risers and the foam base using a hot glue gun.


 Plaster cloth was then applied horizontally across the paper strips to create the fill.


Turning to the Aughwick, I painted the bottom of the creek bed a medium green to suggest depth.


At this point I felt the need to add something behind the bridge -- other than a bare wall!  I have purchased commercial backdrops before and been satisfied with the results.  So I contacted Backdrop Junction and ordered a backdrop with mountains from central Pennsylvania. The backdrop arrived rolled up in a mailer.  I mounted it on a long piece of 1/8 inch Masonite.  Here is what it looked like before being placed on the layout.


And here is how it looks in place with the bridge in the foreground.  What a difference!


Since my photos of the stream showed water flowing over shallow rocks, I collected various pebbles from my backyard, cleaned them up and glued them to the creek bed,  I added a dead tree that would be partially submerged in the creek.


Before adding the Magic Water, I completed detailing the bridge, to avoid dust settling on the water.  The first order of business was to paint the piers and abutments.  Here is what they looked like out of the box -- not very realistic.


To create the weathered stone bridge abutments and piers, I sprayed them with Model Master FS36081 Euro 1 Gray, leaving the stone work a very dark color.


Then I used a sponge applicator to lightly dab the stones with Pan Pastel 28207 Neutral Gray Tint.


 The effect was to give the stones a light gray surface with dark seams and cracks that mimic the prototype.


For the bridge approaches, I used the same scenery techniques as on the valley floor.  I discovered that the original approaches were wooden trestles, which were replaced by boney from the mines.  Since I had a large container of boney I collected at the annual EBT Homecoming, I screened it to remove large pieces, and used the fine residue in place of ballast.


With the bridge and approaches finished, I turned to the Aughwick.  Woodland Scenic's Magic Water is a two part epoxy.  I followed the instructions on the container, mixing two Dixie Cups of epoxy with one cup of Hardener and then stirring the two together for five minutes.  I then poured the mixture into the creek bed.  (I was careful to put a large cookie sheet under the benchwork in case of a leak).  When the "water" was thoroughly cured, I applied thin beads of Woodland Scenics Water Effects.  The beads trailed "downstream" from the pebbles I had glued to the creek bed.  Water Effects takes a while to set, so there is plenty of time to work on it.  I took a stiff brush and stippled the beads to spread them and draw them out a bit.  Water Effects comes out of the bottle thick and white, like glue, but it dries clear.  After a day or two, I finished the creek by lightly dry brushing white craft paint over the ripples, giving the effect of gentle rapids.


The final touch was the addition of a few Woodland Scenics fly fishermen along the banks of the creek.  As a train rumbles overhead, the fishermen in the creek below are casting for those illusive Aughwick trout!  Watch the action here:  https://youtu.be/KY5kbxaZ1K4