Thursday, October 27, 2016

The EBT Locomotive and Machine Shops

On my last visit to the East Broad Top Railroad, I spent several hours exploring the locomotive and machine shops in Rockhill, Pennsylvania.  The shops were in daily use up to the abandonment of the railroad as a common carrier in 1956.  When the EBT was reborn as a tourist railroad in 1960, the shops were occasionally open for tour, and were used by the railroad for maintenance and repairs of their fleet of 2-8-2 Baldwins.

When I entered the shops, I found myself transfixed by the museum-like character of the place. Everything was just as it was when the shop crew went home 60 years ago and never came back.  A layer of dust covered tools and machines, while shafts of sunlight fell across the wooden floor boards.  

Among the most iconic images of the EBT shop complex are the towering twin smoke stacks that rise from the centrally located boiler shop.


The stacks are located directly over two massive boilers which provided power to the machine shops and other buildings in the complex.


Power was provided by several stationary steam engines located next to the boilers.  One engine, which had not operated for more than half a century, was recently restored by members of the Friends of the East Broad Top.  Since steam was no longer available, they modified the stationary engine to run on compressed air.  


The stationary engine was connected  to a system of shafts and pulleys that powered the various machines throughout the shop.  Shafts also ran to nearby buildings.  Steam from the boilers was used for heat and power in nearby buildings, such as the blacksmith shop, where steam was used to drive an enormous steam hammer.  The belts now hang limp and useless from the overhead shafts.


The visitor is struck by the sheer size of the machine tools used to service and repair the locomotives, which weighed as much as 80 tons!  The FEBT has placed lables on many of these devices, such as the locomotive wheel lathe shown here.  The EBT rotated their engines, so that one of them was in the shop at any given time.  The locomotives were parked over a service pit, allowing the 48 inch drivers to be dropped, then moved to the lathe for turning.


Servicing a steam locomotive required a lot of tools, many quite large.  Here is a rack of various wrenches, levers and other unexplained implements used by the railroad..


Here are some of the other shop machines found throughout the building.  Many a weekend handyman may have tools with similar names, but not in this size!  Here, for example, is a brake cylinder machine.


Nearby is an axle lathe.


And here is a more conventional lathe.  Notice the belt drive on the left, which took power from the overhead pulleys and shafts.  Working in a shop like this must have been incredibly noisy!


And here is an oversize drill press.


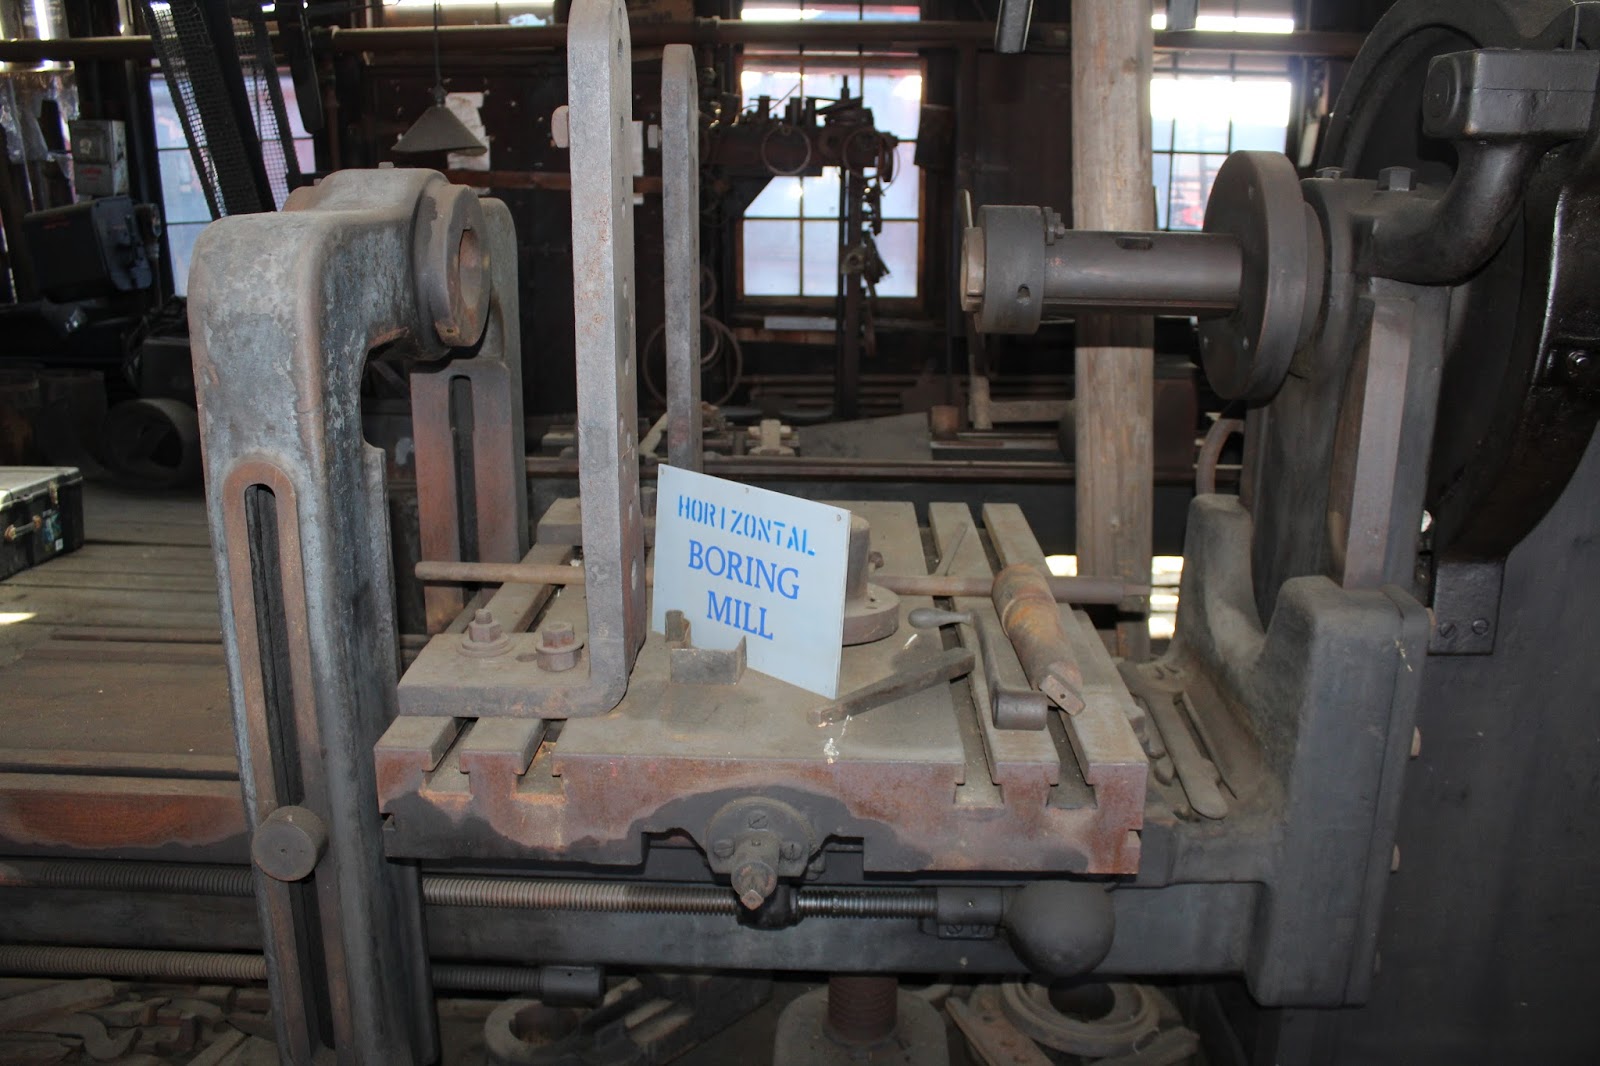
Workmen in the days of steam had to make make many of the things they used on the railroad.  On the EBT scrap metal was cast and forged into wheels for the rolling stock.  In order to mount the wheels on axles, a hole had to be bored in the casting.  Here is a horizontal boring machine.


And here is an enormous hole punch.


The shop machines, most of which have not been used for more than sixty years, are impressive.  But I was also fascinated by little scenes scattered throughout the shop, that gave a sense of what workers did in those days.  Here, for example, is a steam generator from a locomotive.  It has been sitting on a work bench for half a century, waiting for the worker to come back and finish whatever he was doing.


Walking through an open door, I came upon what seems like the main electrical panel for the shops. If this were today, I suspect OSHA would cite them for all those exposed knife switches.


On a nearby table was a pile of pick-ax blades.  What do you suppose they were going to do with all those pick-axes?


Everywhere you look there are bins filled with bolts, drill bits, and other small parts.  Here is a small sample of what I found, everything covered with a half century of dust.


As I turned to leave, I couldn't help but notice little signs of the people who made their living working on the railroad, so many years ago.  A couple of outsize wrenches, a brace and bit.  All reminders of a time when coal was king and the EBT was the lifeblood of southern Huntingdon County.  


I hope you enjoyed this brief tour of a world that time has forgotten, the locomotive and machine shops of the East Broad Top.  Special thanks to the Friends of the East Broad Top, whose efforts have maintained and protected this wonderful place for more than fifty years.

Wednesday, October 5, 2016

Switch Control with Touch Toggles

My layout incorporates a couple of dozen turnouts, which I have been slowly mechanizing with Tortoise switch machines from Circuitron.  Retrofitting that many switches is challenging enough, but building the controls and signals for them is a task I have been avoiding.  I did build a panel to operate the wye for my dual gauge yard, using DPDT toggle switches and red/green LEDs.  I wasn't really happy with the result.


Then, a year ago I attended the Amherst Train Show in Springfield, Massachusetts, where among hundreds of vendors, I ran across a display of electronic modular controls by Berrett Hill.  (Use this link for more information: http://www.berretthill.com/controls/ )  The system is based on small devices called Touch Toggles, which have a red/green LED and a touch activated switch in a small square plastic unit.  These Touch Toggles can be plugged into base units, running on 12 volts DC, which in turn power a Tortoise or similar switch machine.  Base units come in 2, 4 and 8 switch options.

I thought about the Touch Toggles for a year, but put off doing anything until recently, when I attended the National Narrow Gauge Convention in Augusta, Maine, and discovered Berrett Hill among the vendors.  After a long conversation, I decided to buy several base units and toggles and try them out on my East Broad Top Railroad.

The system is simple and easy to install.  Here I have a 4-input base unit not yet connected to switch machines.  The blue terminal blocks on the left side of the base unit are where you connect the wires to the switch machines.  At the bottom of the base is a plug from a "wall wart" baseboard transformer.


The neat thing about the Touch Toggles is that they switch polarity and color simply by touch.  Berrett Hill suggests several ways of mounting the components to make a simple and easy to use control panel.  At their suggestion I bought several 6x8 picture frames from a nearby craft store.  The frames are about 1 1/2 inches deep.  Using Windows Power point, I made a simple track diagram roughly the same size as the picture frame.  After printing the diagram, I took the glass from the picture frame as a guide and used a hobby knife to cut out the track diagram, which I then placed in the frame.


Above you see the Robertsdale interlocking plant in the picture frame.  In this photo the Touch Toggle switches have already been installed and powered up.  The toggles are installed on the back of the track diagram using double sided Scotch Magic Tape to hold them in place.  The 1 1/2 inch frame is deep enough for everything to fit neatly.  I cut a piece out of the bottom of the frame for the wires. Here is the back of a panel with the toggles taped in place.  The black and white wires attached to the blue terminal blocks go to four switch machines.


After the electronics are in place, I needed something to hold everything in position and press the toggles against the back of the track diagram and picture glass.  I opted for polyester batting, used in making quilts.  I picked up a large roll from a fabric store for less than $10.  Batting is easy to work with and you can simply stuff it into place and close up the panel with a piece of cardboard.  Here I have covered the toggles on the left with batting.  I haven't yet stuffed the side with the base unit.


Once the batting was in place, I covered the back of the assembly with the cardboard that came with the picture frame, and pressed it down.


My layout has a Masonite fascia to which I planned to mount the control panel.  I bored a hole in the fascia with a hole saw, and secured the back to the picture frame with double sided carpet tape.


After testing to make sure everything was working properly (and that the switch positions corresponded correctly to the panel lights) I simply pressed the doubled sided tape onto the fascia. Here is a similar four switch panel for the Robertsdale wye and the upper end of the yard.


Touch Toggles are a simple and elegant way to install fingertip control for your Tortoiose and similar switch machines.  Berrett Hill has a complete line of supporting devices for the system.  It is not particularly cheap.  The cost works out to about $10 per toggle, assuming you provide your own 12 volt power supply.  A large yard would cost close to $100 to convert.  But I like the touch control and indicator lighting.  I have two panels in place and a third one ready to mount, which will control four turnouts for a double crossover.  

Saturday, October 1, 2016

The 2016 National Narrow Gauge Convention, Part V

This was my very first national convention -- of any kind!  I have attended a couple of large model railroad events, but nothing like the NNGC,  Other gatherings, like the Amherst Train Show in Springfield, Massachusetts, may be larger, but the 1400 folks who came together in Augusta are a unique breed.  For one thing, they are narrow gaugers.  Narrow gauge modeling is a kind of niche hobby within the larger model railroad community.  There is a real sense of community among us, whether we love the winding railroads of the West, clinging to the side of enormous mountains, or the two foot puffer billies of Maine, or the mining and logging railroads of Pennsylvania, Ohio and the Southeast.  What else could have brought together a couple of Cape Cod model railroaders and a Pacific coast modeler from Oregon.


It's just that we all enjoy watching little narrow gauge engines chuffing along on light weight rail, wherever it might be.  Ross Ames' PC&N is a long way from Dave Trimble's Colorado based layout or my own East Broad Top, but to us it was perfectly natural.


Don't get me wrong.  I enjoyed every aspect of the national convention, from the modular layouts to the contests, the field trips, the clinics, and the wonderful tables of modeling stuff to spend my money on.  But I think what I will remember most was the people I met -- the opportunity to meet narrow gauge modelers from all over the country and around the world.

Sometimes it was sharing an adventure together, whether that was riding in an open Ford inspection car or pumping an old time track car.  People from different backgrounds and different parts of the country became instant friends.  That old slogan from the NMRA certainly seems to hold true: Model railroading is fun!


Conversations sprang up spontaneously, the instant we spotted someone with a convention name badge or a railroad shirt or hat.  Breakfast at the motel was fun, because it was an occasion to chat with someone from South Carolina or California, or even Australia.  Instant acquantances sprang up over a cup of coffee.  And every modeler had a story to tell.  On Wednesday, when I rode on the WW&F, I got to know many of the folks in the lead coach as we snapped pictures and enjoyed the ride together.  By the end of the ride, we were like old friends.


Whether it was exploring the slate quarreys of the Monson Railroad or following the long abandoned right of way of the Kennebec Central, you were constantly meeting and sharing with people who had only one thing in common: We all loved narrow gauge railroads.


Of course, there were social events deliberately programmed into the convention agenda.  Over 200 of us gathered at Pine Tree Camp some 30 miles from Augusta, for a huge lobster bake.


As folks arrived, we were greeted by the sight of lobsters, corn, potatos and seaweed baking over open fires.  That was a lot of lobstah!


Just imagine, hundreds of narrow gauge modelers lining up under a crystal blue Maine sky to have their plates filled to overflowing with lobster, corn, potatos, corn bread, salad, and blueberry cobbler with whipped cream for dessert.  It was certainly a meal to remember.


I sat with Ross and his wife, who graciously posed for a photo.  Notice that everyone else in the place was too busy eating to take pictures.....


The convention finally came to a close on Saturday evening, with a concluding cocktail party and closing event.  The meeting was conducted by Lee Rainey, the 2016 chairman.  Awards were presented to the winners of the model and photo contests.  I was pleased to note that Ross won first prize for his HOn3 Neskowin.   Here he is with his first place award.


Our last official action was to vote on a location for the 2021 convention.  Planning is five years out, and the sites  of the 2017, 2018, 2019 and 2020 conventions have already been set.  Chairman Rainey asked for proposals, and received a formal bid from Hickory, North Carolina.  The last convention in that State was several years ago.  The North Carolina contingent presented a video about their site and its attractions.  Then Chairman Rainey asked if there were any other bids.  Two gentlemen stood up and invited us to Dallas, Texas.  The assembly was then asked to vote between the two sites, and the vote went to North Carolina.  (But I suspect the Texans will be back next year to try again!)

This concludes my summary of the 2016 Narrow Gauge Convention.  Next year's convention will be in Denver,Colorado, home to many narrow gauge railroads, several of which continue to operate today: The Cumbres and Toltec, the Durango and Silverton, the Georgetown Loop and more.  I invite you to consider making Denver your destination for next year's gathering.  It will certainly be a convention to remember!


Russ Norris on the Kennebec Central