Sunday, October 26, 2014

Crafting the Roundhouse Roof

When my roundhouse walls arrived from Michael Rebeiro, they came with two sets of roof templates.  Since the roof is peaked, there were separate templates for the front facing section and for the rear section of roof.  From this side view you can see how the roof is constructed.


The roof is designed to be supported by the walls and seven wood trusses.  My options were to make the roof out of the 16 roof templates (or from some material cut to the dimensions of the templates) or to use the templates to make two roofs -- one that would go from side to side and cover the front half of the roundhouse, and the other to cover the rear.  I wanted to be able to remove the roof for viewing and servicing if necessary, and the idea of removing 16 separate pieces of roof seem impractical.  So I tried cutting a piece of .030 (1/32) inch styrene sheet using the front roof templates laid side by side and taped to the styrene as a pattern.  Here you can see the templates.  You can also see that something was very wrong with the roof!


If you look at the right side of the roof, you will see a gap between the end of the roof and the side wall.  (Ignore the styrene extending over the tracks.  I hadn't yet cut the front of the roof to the templates.)  It appeared that the roof was too short!  Here is a closer look at the right side.


There was a gap of more than an inch.  At first I was nonplussed by the shortfall.  How could the templates be undersized?   Then I remembered that when Mike Rebeiro sent me the first castings for the roundhouse -- which we discovered was too small -- he had sent me the roof templates for that model.  I quickly checked the templates for the second version with the templates from the first.  Sure enough, it appeared that Mike had accidently shipped the smaller templates with the new roundhouse.  Just to be sure, I placed the old front wall on the roof for the larger roundhouse.  It was a perfect fit!


That solved the mystery, but when I contacted Mike to request a second set of roof templates, I learned that he was out of the laser board that he used to make the templates, and a new shipment was not expected for several weeks.  Not wanting to wait, I decided to forge ahead and make the roof without the roof templates.  My solution?  Use the floor templates, which were the correct size for the new roundhouse walls.  The floor templates abutted each other along the same lines where the roof templates ought to meet.  It was necessary to do some fudging with the templates, as the roof extends beyond the front wall of the building and the floor templates do not.  With a little adjustment, I was able to cut out new front and rear roof sections.


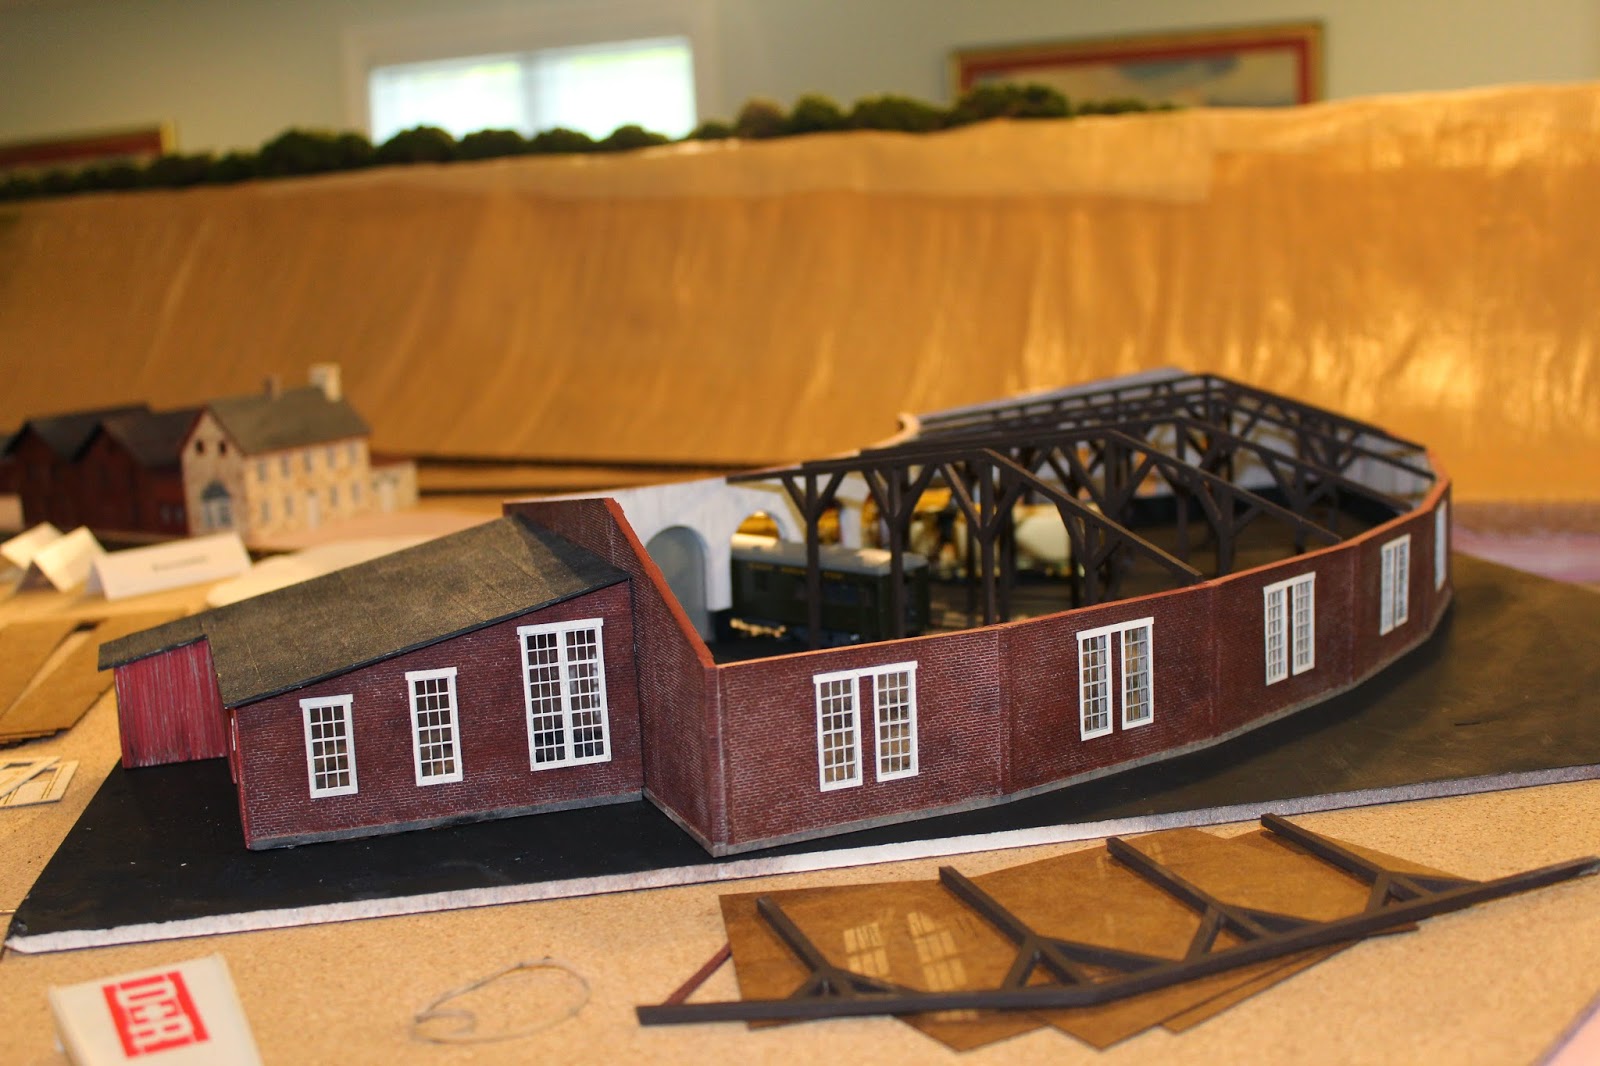
The front and rear roof sections are taped together here, so that I could get a sense of how the roof would set on the roundhouse walls.  My thinking is that the rear section will be cemented to the walls and trusses and fixed in place once the building is finished.  The front part will have small pieces of 1/8 inch styrene stock glued underneath, so that the roof will rest on the front and side walls without slipping.

The next step in constructing the roof was to cut the holes in the rear section for the roof vents (which sit just behind the peak of the roof on the prototype) and for the smoke stacks.  Mike had cast the vents and caps when he made the walls, but he was unsure how to model the stacks that vent smoke from the locomotives.  I decided to use 5/16 square styrene tubing and cut holes in the roof accordingly.


Here you can see seven of the roof vents ready for mounting on the roof, but not yet painted or glued together.   Below is a  photo of the roof vents after painting.  The wooden vents were painted roof brown while the metal caps are grimy black.


 The kit included eight vents, but in reviewing the HABS/HAER drawings from the Library of Congress, I learned that there were never any vents or stacks on the eighth stall at the far left.  When the original six stall roundhouse was rebuilt after a fire in the early 20th century, the left-most stall was used as a paint shop, not for parking steam engines.  Today there is a fine brick paint shop adjacent to the roundhouse and the eighth stall currently holds the largest of the 2-8-2 mikados.  I opted to go with the historical record and leave off the eighth vent and stack.


From the rear you can see the roof vents and the square holes for the locomotive smoke stacks.  I am currently working on developing CAD drawings  for the stacks for 3-D printing.  We shall see how that works out.  An alternate plan would be a length of 5/16 inch square styrene with a flat cap.


From the side you can see how the roof will look when finished.  The rear overhang appears to extend out too far -- some four feet!  I will trim the edges when making the final adjustments.  I can't install the roof yet, since it has to rest on the seven interior roof trusses, which I am not ready to put in place.  I am working on a plan to light the interior using surface mounted LEDs suspended from the trusses, and that needs to be in place before I secure the roof.

The roundhouse is temporarily on hold while I construct the turntable.  The two projects have to be completed together in order for everything to fit correctly.  My next post will outline construction of the 65 foot steel girder turntable from Kitwood Models in the U.K., which replicates exactly the turntable and pit that currently occupy the space in front of the EBT roundhouse.

Monday, October 20, 2014

Building the EBT Roundhouse -- Laying the Track

In my last post, I described my excitement when Michael Rebeiro delivered the kit for my new East Broad Top roundhouse.  The project had started out simply as an offer to reproduce the aged brick walls and windows of the prototype that still stands in Rockhill Furnace, Pennsylvania.  I have wanted to model the structure for years, but never seemed to be able to come up with realistic brickwork.  Since Mike was producing a brand new building never before available commercially, he offered to make not only the walls, but the doors, windows, roof vents, roof trusses, and templates for the floor and roof.  Finally, he asked if he could paint the building inside and out to see what the finished model would look like.

When the kit arrived, I was delighted.  The weathered brick walls came out better than I could have hoped.  In fact, the level of realism was outstanding.  Here are a couple of pictures of the finished product before delivery.  Mike took the photos in his yard with real trees for background.


In painting the roundhouse Rebeiro used familiar techniques for achieving the level of realism you see in the pictures.  He is developing a PDF file that describes how he painted the structure.  The file will be included with the kit.  The windows and doors are made from layers of thin laser cut material that assemble easily.  Anyone familiar with peel and stick windows in craftsman kits will have no difficulty with them.

Mike delivered the roundhouse on a sheet of black foam core board.  I gently carried it to the layout and tried placing it in various positions, to get a sense of how it would integrate with the Rockhill shops and yard.  The white circle represents the 65 foot turntable that will sit in front of the structure.


My layout has a base of 2 inch extruded foam insulation resting on a grid of 1 x 4 pine.  The Rockhill yard and shop complex sits on an additional layer of 1/8 inch cork.  I wanted to be able to work on the roundhouse without having to stand on a stool under the pop-up behind it.  The easiest solution was to mount roundhouse and turntable on a slab of foam insulation and cork, then cut a hole in the layout the same size as the module.  When finished, I can then drop the roundhouse and turntable into the hole.  With that in mind, I cut a 26 x 28 section of foam, and glued a layer of cork to it using Aileen's Tacky Spray.  I deliberately made the cork wider than the foam so that it would cover the crack when the module was dropped into the yard.   I then moved both foam and roundhouse to a separate work area.


You will note that the garage on the right side of the roundhouse (visible in the previous picture) is not included on the foam base.  It seemed simpler to have just the roundhouse and turntable on the moveable section.  Once the module is dropped into the layout, the garage unit can be easily moved up against the roundhouse.  This keeps the movable section as compact as possible.

With the roundhouse in place, I used the floor templates (visible inside the structure) to draw converging lines to determine the center of the turntable.  I then used a compass to draw the 65 foot turntable pit, and cut eight sections of HOn3 code 70 track from the roundhouse to the turntable.


With the tracks roughly in the correct position, I tried moving a locomotive in and out of the roundhouse.  Almost immediately I detected a problem.  The first set of walls that Mike Rebeiro made had the entry doors too small for engines to pass.  The new walls left sufficient doorway clearance on both sides of the engine, but the roof of the cab scraped the curved arch of the doorway.

What was the problem?  Photos of the prototype show that the rails and ties on the inside of the roundhouse are buried in gravel, so that the tops of the rails are level with the floor.  In my model, the rails and ties sit ON the cork floor, making the rail heads 1/8 inch too high to clear the arch.


Not wanting to ask Rebeiro to make a third set of castings, I thought about ways to work around the 1/8 inch difference.  I could, of course, raise the roundhouse 1/8 of an inch, which would have been a bear to do.  Finally, I decided to capture the 1/8 inch difference by LOWERING THE TRACKS by that amount.  Since I already had a 1/8 inch layer of cork on top of the foam, I could simply use a hobby knife to cut away the cork from around the tracks, using the floor templates as guides.  The area from the roundhouse doors to the turntable would also be cut out, to be later filled in with ballast.  Since the entire yard sits on the cork, that would require a height adjustment on the approach tracks, but I figured that was a minor inconvenience.


In the above photo, you can see where the cork has been cut away in two of the stalls, along with the cork around the tracks from the roundhouse to the turntable.  The 1/8 inch difference allows the engines to clear the top and side of the door openings  (The rectangles drawn on the cork represent the locomotive service pits.)

The code 70 rails are .070 inches in height, which is a tad more than 1/16 (0.0625) of an inch.  The ties are a little less than 1/16 inch, so that the combined height of rails and ties is just about 1/8 inch, which is also the thickness of the cork.  It occurred to me that I could use strips of 0.060 x 0.188 Evergreen styrene to sit on the ties on either side of the rails, making it appear that the floor extends up to the rail heads.  A wider strip (0.060 x 0.250) over the center of the track would leave just enough room for wheel flanges to clear.  In the following photo, you can see the side strips in place under the EBT's M-1 gas electric doodlebug.  The floor, both cork and styrene strips, will be painted and covered with fine gray ballast to simulate the gravel floor in the prototype.


Here is an over head view of the roundhouse with all eight stalls cut out, but without the styrene strips installed.  In my next post, I will detail how I constructed the roof to allow for easy removal and servicing.  Future posts will focus on construction of the turntable and lighting the roundhouse using surface mounted LEDs and track power.


Wednesday, October 15, 2014

Building the Roundhouse - Final Version

In my last post I wrote about receiving the first resin castings from Mike Rebeiro and discovering that they were too small.  After rechecking the dimensions on the HABS/HAER drawings in the Library of Congress, as well as drawings on pages 212-213 of Along the East Broad Top by Donald J. Heimburger (Heimburger House Publishing Company: River Forest, 1987), Mike laser cut a new set of molds for the walls and details.  Several weeks later, I received photos of an assembled and painted model of the roundhouse mounted on a sheet of foam core board.  It was magnificent!  It was also very large!


I was especially impressed with the realism of the roll down doors.  I had found a few styrene roll down doors in my scrap box that I picked up at a train show some years ago.  Mike make a mold from one of these doors and produced a door that was an exact fit.  Even more amazing was the level of realism he achieved by painting the doors.


Compare this photo with one I took recently of the roll down doors on the prototype.


I was surprised to learn that Mike had achieved this effect with just two bottles of paint: Polly Scale Stainless Steel and an inexpensive acrylic called Country Red, available from any craft store.


Needless to say, I was delighted.  With the trees in the background, it almost looked like the real thing.  A few days later, Mike arrived at my front door carrying the roundhouse, still on the same piece of foam core.  The level of detail was amazing.


I invited Mike to the train room, where we gently placed the structure on the layout, in approximately the position it would occupy when completed.


The roundhouse will set at one end of the EBT shop complex in Rockhill Furnace.  I cut a piece of paper using a compass to draw a scale 65 foot circle, so I could visualize where the turntable would go.  Of course, I had to see what it looked like with some of the EBT's motive power in the stalls.


Note that the structure does not have a roof yet.  Mike provided me with a set of templates for the front and rear roof sections, as well as the roof vents.  The saga of the roof will be told later.

I decided on how the roundhouse would be oriented.  My layout sits on slabs of 2 inch foam insulation. Once I knew where the structure and turntable fit, I determined how large a piece of foam would be needed to support it.  I cut a 26 x 28 square of insulation, which was just big enough to fit the roundhouse itself, not including the garage/shed that is attached to the right side.  I figured that once the roundhouse was ready, I would cut a 26 x 28 inch hole and drop in the basic structure and turntable as a single unit.  The garage is separate, and will be tucked up against the building after it is in place.


In my next post, I will describe how I mounted the roundhouse on its foam base with a layer of 1/8 inch cork on top.  The cork layer will play a very important role in the installation.  I will also return to the question of the roof and how I decided to construct it in two easily removable pieces to allow for viewing and servicing the building in place.  Future posts will focus on internal lighting using surface mounted LEDs suspended from the rafters, and on the construction and installation of the turntable.

Thursday, October 9, 2014

Building the EBT Roundhouse -- First Attempt

As I said in my previous post, I have been looking for a way to construct the EBT roundhouse for some time.  By chance I made contact with Stone Mill Models and its owner, Michael Rebeiro.  Rebeiro had been listening to a conversation on Yahoo's Narrow Gauge Chat group, and offered to produce the walls for the roundhouse by laser cutting molds and casting the brickwork in epoxy resin.  We agreed on a very reasonable price and the deal was struck.

Rebeiro's biggest challenge was the front of the roundhouse, which is rounded to conform to the 65 foot turntable that sits in front of the roundhouse.


From field notes and from the HABS/HAER drawings in the Library of Congress, the dimensions of the building and the distance from the center of the turntable to the roundhouse is precisely known.  It was simple geometry, then, to calculate the curvature of the front wall, which in HO scale worked out to approximately a 20 inch radius.  As Rebeiro explained, the problem was casting a curved resin wall from epoxy resins that are semi-liquid when poured.  His solution was to cast the front of the roundhouse flat, then gently heat the casting and gradually bend it over a round object with a 20 inch radius.  But what to use?  He looked at a variety of curved surfaces, and finally settled on a snare drum with the required radius!  I was delighted with the result.


Rebeiro's plan was to cast each side wall in one piece.  The rear walls would be composed of eight identical sections, individually cast and cemented together.  Interior brickwork would be added on the wall visible from the aisle once the building was finished and installed on the layout.  He also offered to include laser cut windows and doors, along with a full set of templates for each of the eight stalls (including the service pits), templates for the roof sections, roof trusses and a set of ventilators for the roof.  When I received the first shipment, it consisted of all these parts:


In my excitement, I set up the front wall on a flat surface and tested it out with several of my HOn3 engines to see how it was going to look.  Almost immediately, I realized that there was something wrong.  The EBT's 2-8-2 mikados and the M-1 gas electric doodlebug barely fit through the doorways.  And the top of the locomotives scraped the curving brickwork.  Clearly, the doorways were too small.


I contacted Rebeiro and we discussed the problem.  He quickly realized that there had been an error in calculating the dimensions of the doorways.  But it wasn't just the front wall.  Enlarging the front wall meant that the entire roundhouse had to be enlarged, new molds and templates laser cut, and new walls constructed.  What I liked about working with Rebeiro was the sense that we were a team, working to create a structure for EBT modelers that had not been available previously.  This was just a glitch in the creative process.

While Michael was redesigning the walls, we discussed some of the other details on the roundhouse.  He had not been able to come up with a way of designing the roll down corrugated doors seen on the prototype.  As it turned out, I had picked up some similar doors at a train show a few years ago, thinking that they might work for the roundhouse.  I sent one of these doors to Rebeiro, who was able to modify it to the correct size door for the doorways.


In one of several conversations, Michael asked if I intended to paint the interior walls white, like the prototype.  I was at a loss for words.  I have been in the EBT roundhouse a few times over the years, but the interior lighting was dim, and I couldn't for the life of me remember what color the walls were.  But checking some of the photos of the roundhouse that I had shared with Rebeiro, I suddenly realized that the inside of the structure was painted black up to the bottom of the windows, and white from there to the roof. The colors are clearly visible in the following photo.


As we discussed painting the model, Michael made a surprising suggestion:  He would paint the walls, inside and out, and use photos for marketing purposes once we had finished our collaboration.  He also suggested adding the lean-to shed on the right side of the structure that was added in the 1930s to house the EBT's small fleet of trucks and busses.  And he would hand deliver the finished product to my door once it was finished!  I was stunned.  I had simply been looking for a way of reproducing the roundhouse walls; instead I was going to receive a complete kit, assembled and painted!  Not being one to look a gift horse in the mouth, I said I would be delighted!  In my next post, I will share photos of the structure as it was delivered, how I developed a plan for mounting roundhouse and turntable on the layout, and the method I worked out for installing the track, building the roof, and lighting the structure.

Friday, October 3, 2014

Building the EBT Roundhouse and Turntable: Introduction

Twelve miles south of Mount Union, Pennsylvania lies the village of Rockhill Furnace, home of the well-preserved shops and service facilities of the East Broad Top narrow gauge railroad.  Across Willow Street from the iconic Orbisonia Station, an eight stall roundhouse houses the six remaining EBT steam engines as well as the M-1 gas electric motor car.  Some version of the roundhouse and its 65 foot steel turntable have stood on this site since 1875.  It is one of the most recognizable structures on the railroad.  This is how the roundhouse appeared in 1930.


A more recent photograph shows the turntable and roll-down doors that still grace the roundhouse.


An aerial view, taken by Lance Myers, gives an overall view of the roundhouse and turntable.  The building on the left with the red roof is the paint shop, where today the Friends of the East Broad Top continue their efforts to repair and preserve EBT rolling stock.  Note the shed on the right side of the roundhouse, erected in the 1930's to house the EBT's short-lived bus and truck fleet.  Behind the roof lies the village of Rockhill.


Over the last several years, I have written about how I built my model railroad, including the fictional town of Blacklog (modeled after Mount Union) with its coal plant, brickyard, and dual gauge yard.  I have written and posted photos describing how I constructed the EBT company town of Robertsdale.   My version of the EBT rumbles south from Blacklog through Rockhill Furnace to Robertsdale and the coal mines on the east slope of Broad Top Mountain.  But to date I have written virtually nothing about Rockhill Furnace and the EBT shop complex there.


It's not that I don't have a number of structures from Rockhill: the car shop, boiler house, foundry, sand house, yard office and storage sheds.  But the anchor for all of these facilities was and is the imposing brick roundhouse and turntable.  And they have proved to be the stumbling block in completing the railroad.


I have been thinking about the roundhouse and turntable for years.  From time to time I played around with various ideas.  I thought of trying to assemble the roundhouse from DPM brick modules, or from various kinds of plastic or paper bricks on styrene walls, and so on.  But nothing gave me the realism I was looking for.  The turntable was even more problematic.  I bought a Model Masterpieces kit for the 65 foot Durango, Colorado, turntable, but wasn't happy with it.  I picked up a Dapol turntable from Britain made of plastic, but it didn't match.  Friends suggested I buy a Walther's N scale 120 foot turntable and modify it to HOn3.  I began to think I would never finish the Rockhill Furnace module on my layout.

The breakthrough came from an unexpected source.  I belong to a narrow gauge Yahoo chat group that is made up of  experienced modelers who, when they're not joking with each other, do some of the finest narrow gauge modeling anywhere.  It was during a discussion of a new product -- laser cut brick walls -- that I mentioned my continuing search for appropriate materials to build the EBT roundhouse.  One of the replies grabbed my attention: Michael Rebeiro, who under the name Stone Mill Models designs and manufactures laser cut model railroad structures, said he could make the roundhouse walls by laser cutting molds and casting the brick walls out of epoxy resin.

There followed a flurry of emails between us, followed by photographs and drawings from my files, along with architectural drawings of the roundhouse and turntable in the Library of Congress (the Historical American Building Survey and Historic American Engineering Record known as HABS/HAER).   After we agreed on a price for the work, Michael input the data into a CAD program on his computer, then used the program to guide a laser that cut the brick work onto special wood panels that would become the molds.

In my next several posts I will explain how we struggled to recreate this unique railroad structure, some of the false starts and problems we encountered, and the final result.  At the same time that I was working with Michael Rebeiro, I also discovered (again, on line) a British company (Kitwood Hill Models) that produces an inexpensive HOn3 kit for the Durango turntable, which just happens to be identical to the one in Rockhill Furnace. The work continues on the roundhouse and turntable, and I invite you to follow along as I construct one of the centerpieces of my model railroad.