The deck girder bridge at the southern end passes over the old road to Three Springs.
My interest in the Pogue bridge was piqued when I stayed at the old Pogue Station, a mile from the south end of the bridge. It occurred to me that a model of the bridge would fit perfectly in a vacant spot on my EBT railroad. But the thought of scratch building all that lacey girder work discouraged me from taking on the project.
Recently, several events rekindled my interest in the bridge. Two fellow EBT modelers, Ric Case and Ron Pearson, both of whom live in the Cincinnati area, shared photos of their models of the Pogue bridge as it appeared in common carrier days. Their modeling was stunning. Here is a photo of Ric's version of the bridge.
While my enthusiasm was renewed, I was still put off by the prospect of scratch building the bridge. But then I discovered that Walther's now offers a single track Pratt deck truss bridge kit, Walther's number 933-4520. And what's more, when I ran across the bridge on the Walther's web site, it was on sale! I immediately ordered two of the kits, along with a 30 foot deck girder bridge from Micro Engineering.
As it turns out, the Pratt deck truss sections are slightly longer than the EBT version. As mentioned above, the EBT bridge was 210 feet long, not counting the girder deck bridge at the southern end. The Walther's bridge sections are 15 inches long in HO scale, which works out to approximately109 feet in length, or 218 feet overall, 8 feet longer than the EBT prototype. The Walther's bridge is also built for HO gauge track, and is somewhat heavier in construction. In order for the bridge to support HOn3 track, I would have to modify the support beams to fit the narrower gauge. To save time, I decided not to use bridge track, and simply lay the code 70 flextrack over the bridge.
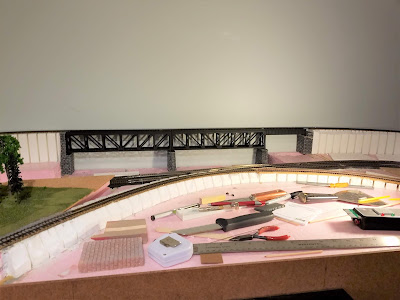
Assembly of the various parts of the bridge followed the directions that came with the kits, and was uneventful. I also purchased Chooch cut stone bridge piers and end supports from my local hobby store. The end supports were resin castings and the two central piers were hydrocal. Because of the height of the trusses, I had to cut down the bridge piers. This turned out to be much more difficult than anticipated. It took forever to saw through the various pieces of stonework.
In addition, the bridge runs along a wall and I needed to leave room for a backdrop mounted on Masonite; so I had to shorten the back of all the piers and supports to allow a 1/8 inch space for the backdrop. Turns out that I cut a bit too much off the piers, and so I had to raise them up using tongue depressors and popsicle sticks as shims. Fortunately, when the scenery was added, all trace of the shims disappeared.
The effect was exactly what I had hoped for. Pogue bridge is part of a return loop that runs between Robertsdale and Blacklog, a free-lanced town that is modeled roughly on Mount Union. The loop allows for continuous running when I am in the mood. Between the bridge and the aisle is a curving 2% narrow gauge right of way from Blacklog to Orbisonia. Separating the narrow gauge track in the foreground and the bridge in the background is a double track standard gauge line, which interchanges with the EBT at Blacklog. The fact that the Pogue bridge is set back from the aisle helps to minimize the differences in the bridge's length and structure.
I was so delighted by the way the bridge turned out that I decided to pose a train on it for a photo. So I replaced the track on the bridge and was about to set a short train on the structure, when a friend watching all this said, "Why don't you just run it across the bridge?" It was a preposterous idea! The tracks weren't even wired for power. The only electrical connection was the metal track joiners at one end. But with my friend urging me on, I gave it a try. Imagine my delight when the little train dutifully chugged across the bridge!
This concludes part one of how I built the Pogue Bridge. Part two will go into detail on creating realistic bridge stonework, scenicking the woodlands and stream beneath the bridge, scenicking the embankments and approaches to the bridge, and installing the backdrop.


Very nicely Russ!
ReplyDelete